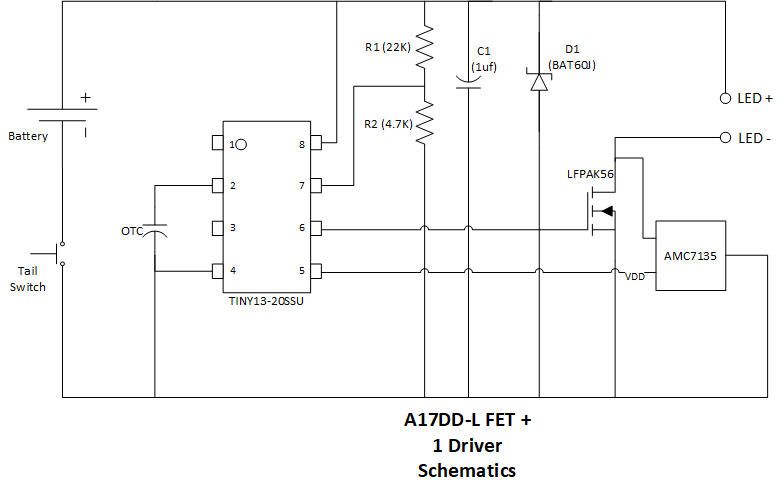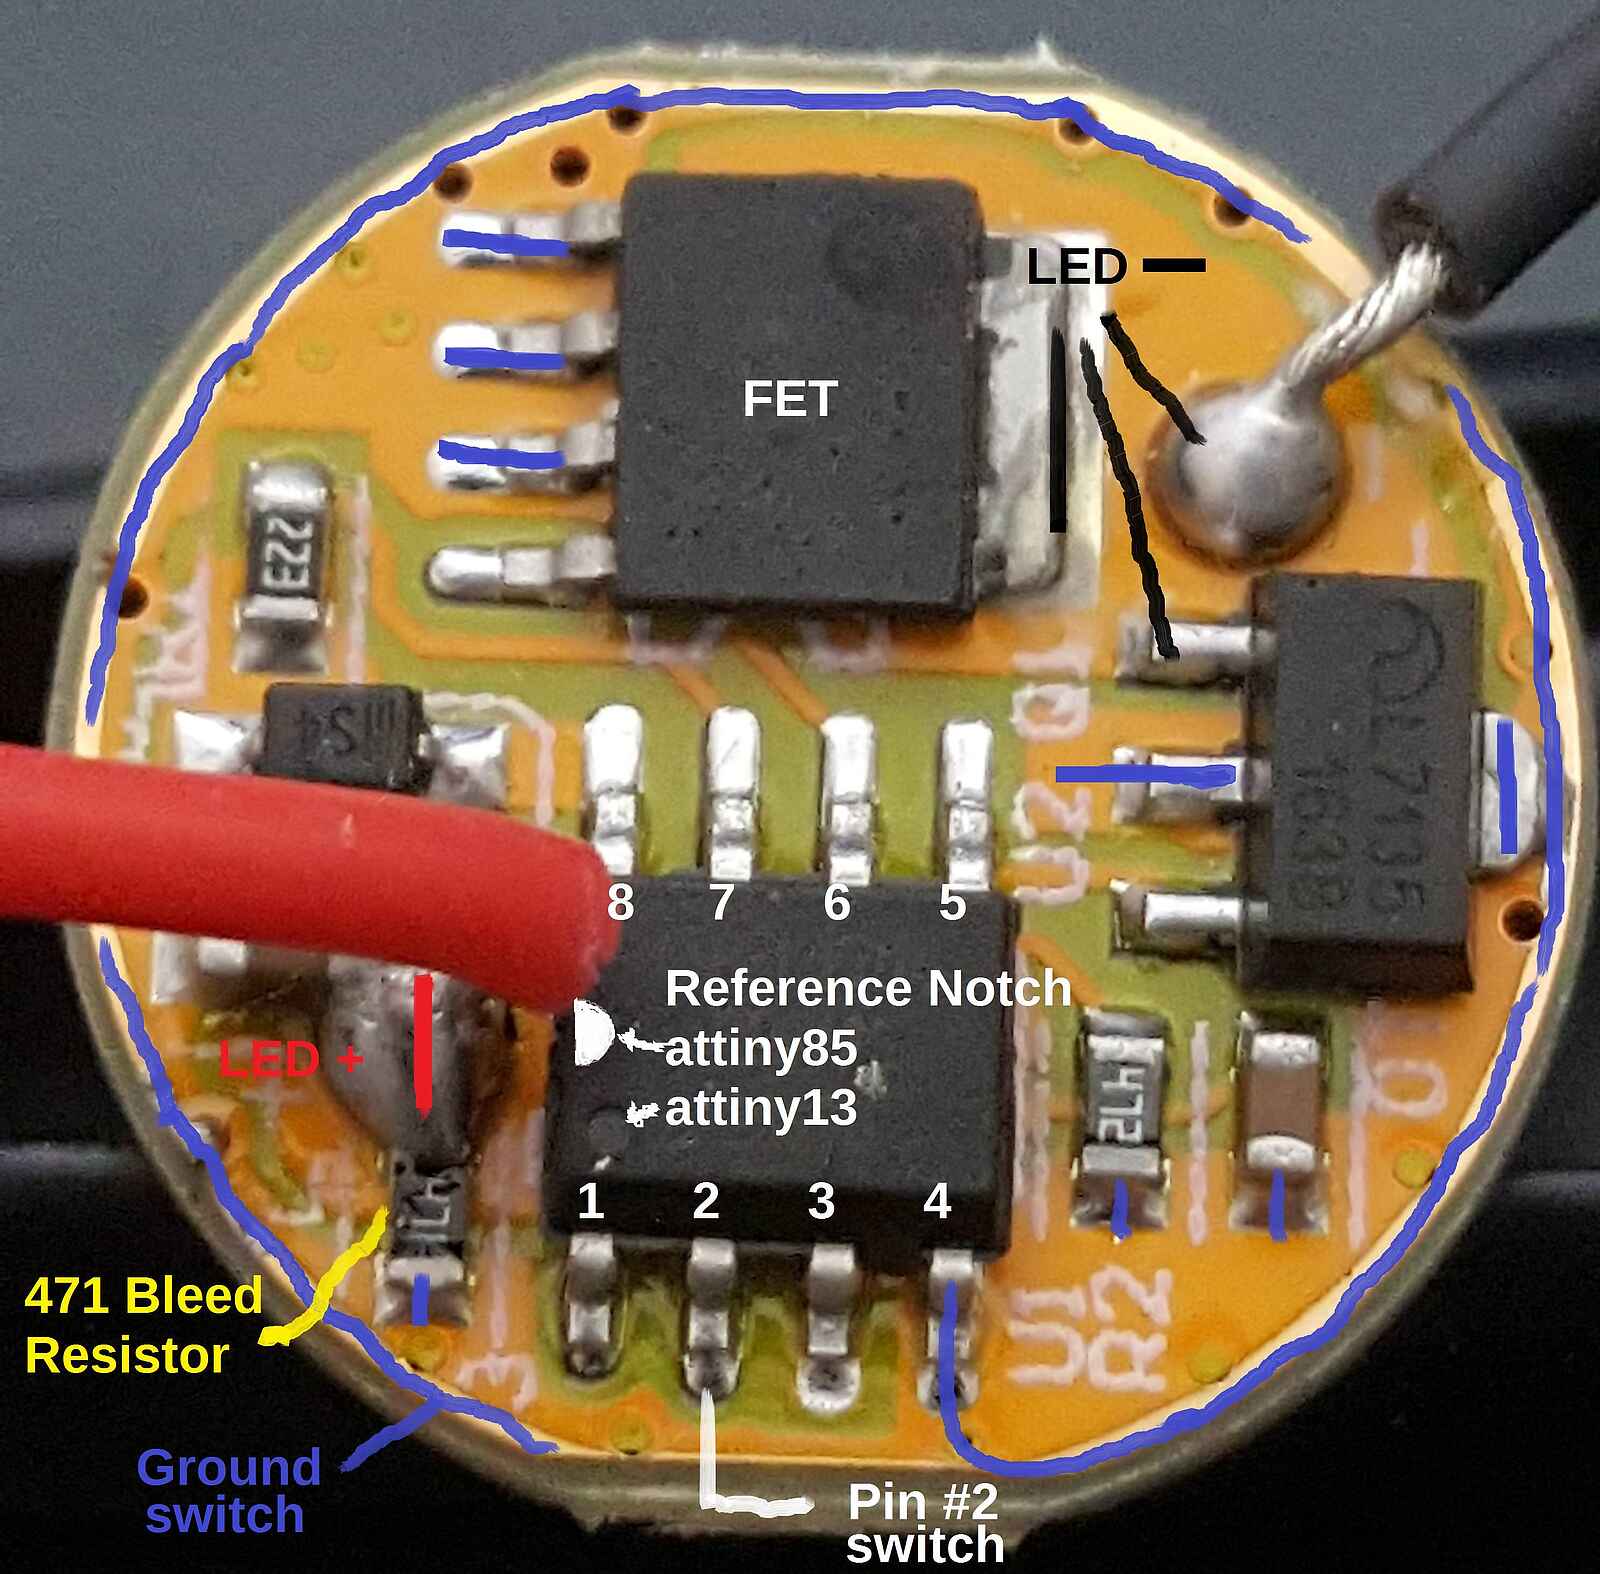
The BLF-a6 is also sold as the "Astrolux S1" and is claimed to use the A17DD-L FET+1 driver board
I strongly recommend the "deconstructing" article. He gets everything right except the diode.

ATtiny13 (probably ATtiny13A) microcontroller
4.7 K resistor
22 K resistor (these two are voltage divider for battery monitor)
BAT60 Schottky diode (reverse protection)
7135 - 350 mA constant current regulator
bypass capacitor (1.0 uF)
OTC capacitor (1.0 uF?) off time measurement
n-channel FET (LFPAK56)
What FET do we actually have. I see the designation LFPAK56, but that is the package, not the part number. The device seems to be a PSMN3R0-30YLD.
The BAT60 diode is drawn as a Zener, but when I look up that part number,
it is a schottky.
The "deconstructing" article says it is a 5.1 volt zener and is present for
overvoltage protection, but why should this be needed?
With single Li-ion cells we should only ever see 4.2 (or 4.35) volts.
I can only think this is protection against putting the battery in backwards,
but then what would limit the current? You would think the diode would just
burn up -- but people say they have reversed the battery in a BLF without harm.
All of this makes no sense.
The answer is simple -- this schematic is wrong. If you study the images of the PCB at the end of this article you can see that this diode is in series with the battery and the microcontroller, delivering Vcc to pin 8. This makes perfect sense, explains why a Schottky diode was chosen, and explains why people have not destroyed their lights by reversing the battery. Calling it a Zener is wrong and nonsense.
What is the value of the OTC? My bet is that it is 1.0 uF just like the supply bypass. This would allow just one value of capacitor to be kept in stock and ought to work just fine. But I am only guessing.
Consider a Ron value of .006 ohms. The Cree XM-L2 has a forward drop of 3.3 volts at 3.0 amps. With a fully charged 4.2 volt battery, we will be dropping 0.9 volts across the FET. That would limit us to 150 amps, which is hardly encouraging.
/ PWM levels for the FET
#define FET_LEVELS             0,7,137 // Turbo mode (255) is a special mode defined below
// PWM levels for the small circuit (1x7135)
#define LM7135_LEVELS             3,110,255
// PWM speed for each mode
#define PWM_MODES           PHASE,FAST,FAST
What he does is to go through the FET and 7135 arrays in parallel, so he gets current from both, except for the first level where the FET is 0 and LM7135 is 3. The highest "FET level" is 137, which is 137/255 of full on -- about 50 percent. Turbo is outside of these 3 levels and sets the FET to 255 (full on).
1) 350 * 3/255 = 4.12 mA
2) 350 * 110/255 + 3000 * 7/255 = 233 mA
3) 350 * 255/255 + 3000 * 137/255 = 1866 mA
4) 3255 mA (turbo)
It seems pretty common for people to measure 2.8 amps of current in Turbo mode. I see claims of higher current (up to 5 amps). I am skeptical. To get over 3 amps of current requires specific batteries and flashlight mods such as providing a high current bypass in lieu of the coil battery spring.
Exactly what limits the current? Something, or the whole thing would catch fire. Note that a Convoy S2+ uses eight 7135 to get a max current of 2800 mA. Well, that is the claim, whether other factors come into play is another question. But I feel good knowing that those 7135 do limit the max current to 2800.
Here are some measured currents for the 7 brightness in the group I always select:
1: 0.45 lm / 2.66 mA / 39 days
2: 10.1 lm / 11.87 mA / 8.7 days
3: 64.5 lm / 139 mA / 18 hours
4: 187 lm / 385 mA ? / 6.5 hours
5: 417 lm / 1.48 A ? / 100 minutes
6: 798 lm / 2.96 A ? / 50 minutes
7: 1386 lm / 5.65 A ? / 26 minutes

Tom's Light Info / tom@mmto.org